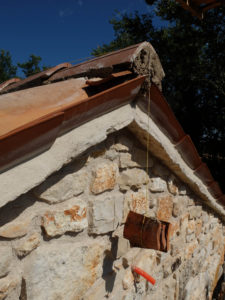
Clay partition wall

It has been more than a year since I last managed to write a post for the blog.

Before I started renovating the house, I remember watching reports of building projects, thinking ‘how can people miscalculate the budget by 30%’ or ‘why is it taking them 3 years longer than planned’.

I’m starting to realize that the misconception of what is possible, and how fast anything can be done, lies way beyond the commonly mistaken belief in the principle ‘that could never happen to me’.

A big part of why creating a legal object in the physical reality of our world takes such a long time, is because we have made some very complex systems of theories (bureaucracy); constituting a base in which the consumer industry is maneuvering their clients (building companies); while they try to create a dream object for their end client. In short: putting a house together requires the cooperation of a lot of different people who have completely different interests. And I’m not just pointing that out to identify excuses for the length of my project. 😉

So what was going on with the renovation in the past year?

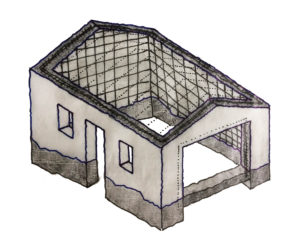
After the house has been refurbished from the outside, time came to start focusing on the interior.

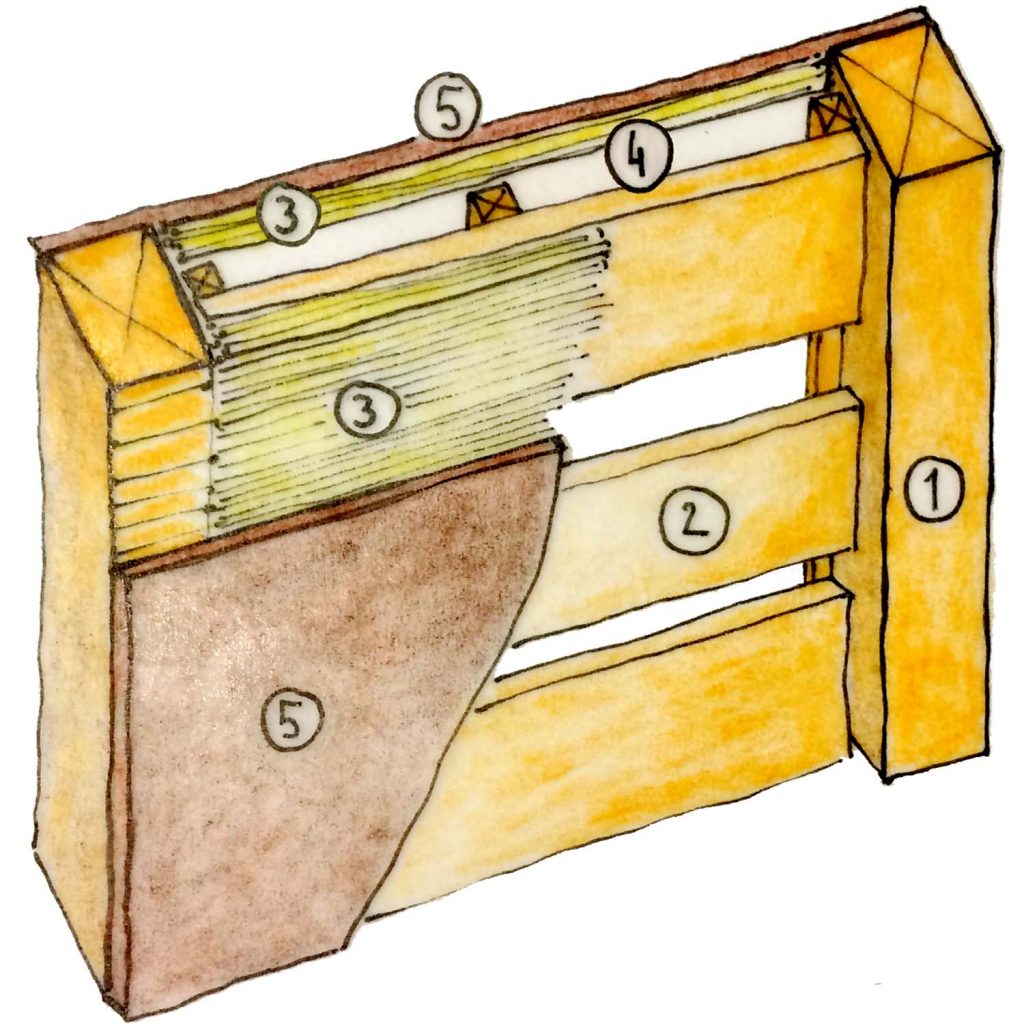
The first thing I wanted to put up was the partition wall. After lengthy discussions on the type of materials to be used and how to put them together I decided to use the following wall composition:

  1. vertical wooden studs dim. 10/6 cm fixed to the floor and roof
  2. horizontal wooden boards 2.5 cm thick attached to the vertical studs
  3. reed panels 2 cm thick attached to the wooden boards directly on the front side and on 2 cm thick wooden spacers on the back side
  4. 2 cm air gap between the wooden boards and the reed panels on the rear side of the wall constituting an opening for the plumbing and electrical cables
  5. clay plasters in 2 layers, 2 cm thick in total: base coat 1.5 cm and finish coat 0.5 cm.

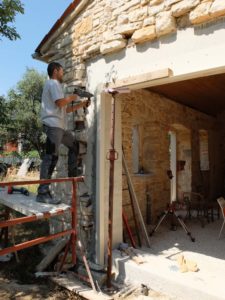
Again it took me quite some time to find an appropriate person to put up the wooden construction. Once we got started though, the groundwork was put up in 2 days.


After the base wooden structure was set up, I could take my time and continue to put up the rest of the elements by myself, experimenting as I went.

First the wooden boards came up.


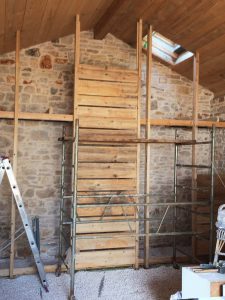
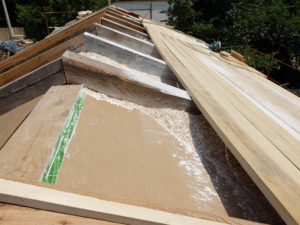
Then there were the reed panels.

And then the clay plaster experiments could start.


First I needed the right material. Instead of buying the already made clay plaster mixtures, I decided to start from scratch.

So what exactly is plaster? And what is clay plaster made of? Let’s talk terminology 🙂

Plaster is the finishing layer of a wall or a ceiling used as decoration and/or protection.

The base of each plaster constitutes 2 ingredients: aggregate and binder.

Aggregate is stone decomposed to various dimensions, ranging from gravel (>2.0 mm), sand (0.06 mm – 2 mm) to silt (0.002 – 0.06 mm). 

Binder is the gluing agent combining the aggregate into a usable mixture. Commonly used binders are clay, lime, gypsum and cement.

Clay is the ultimate decomposed product of rocks, primarily comprised of minerals. The particles have a diameter smaller than 0.002 mm.

Water is mixed into the combination of aggregate and binder to make it more plastic, which means creating a workable mixture that is easier to apply to the supporting structure.

Other components might be added to improve certain characteristics, but they are optional (fibers, oils, pigments,…). 


When I started discovering the incredibly vast world of natural materials in Istria, the local earth stood out as the most fascinating element to me. I tried to find a way in which I could use the beautiful reddish soil as it is and add as little as needed in order to use it as a building material.

Since soil is naturally a mixture of stones of various dimensions combined with clay, what else would I need to add to be able to use soil as plaster?

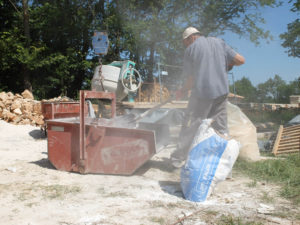
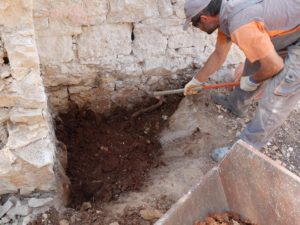
I hauled 9 m3  of local soil from a nearby building site and started experimenting.

First the classic tests: mixing the material with water, making a ball, rolling a cigar,… The real breakthrough came when I went to an amazing workshop in Austria where (among other things) we made a sample out of the Istrian soil I brought with me.

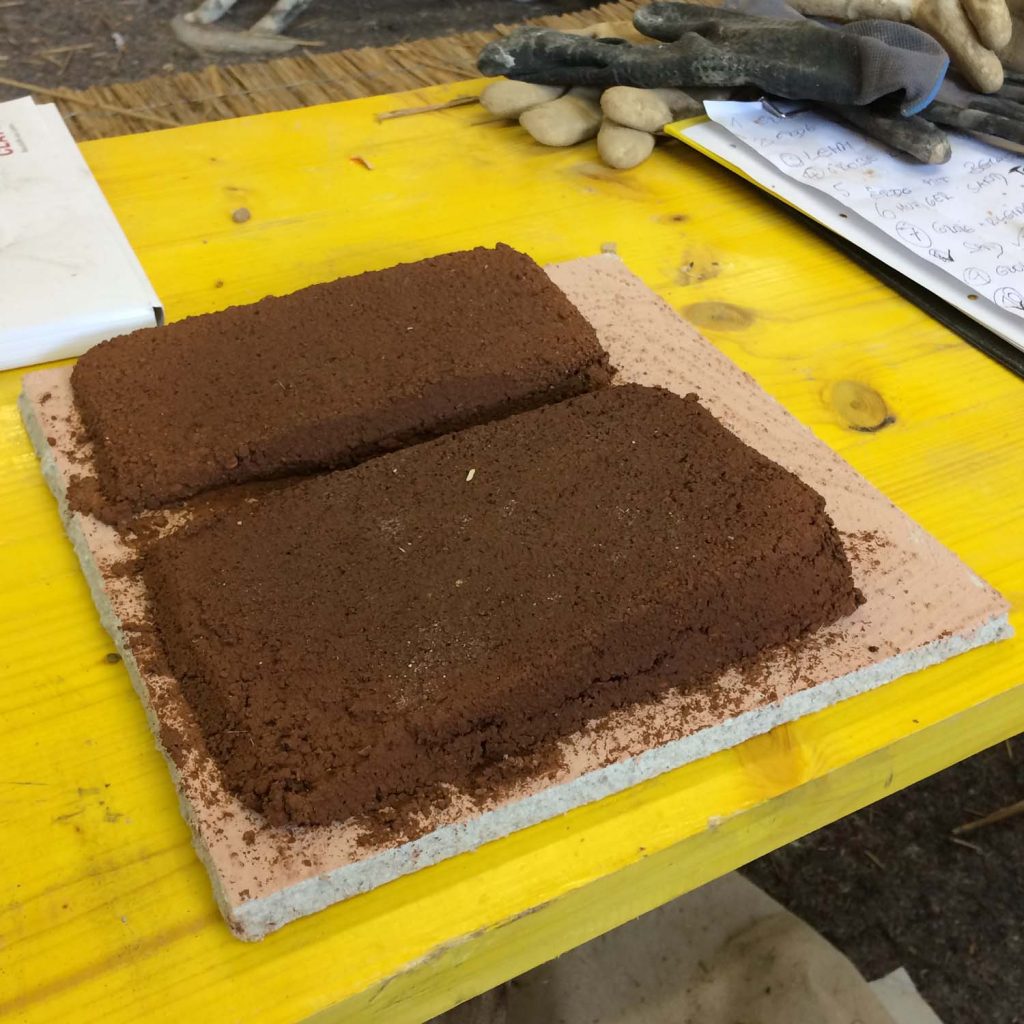
The material dried and it seemed to behave like a proper plaster. The only thing we added to the original soil was sand. Could it be that easy?

I decided to give the simplest option a try: adding only aggregate (sand). The first thing I needed to test out was how much sand to add.

I made different mixtures of earth and sand (grain size from 0 to 4 mm) and applied them to my reed panels, in order to figure out which one has the best combination of properties: holds well on the reed, has no cracks and does not fall apart easily when you press on it.

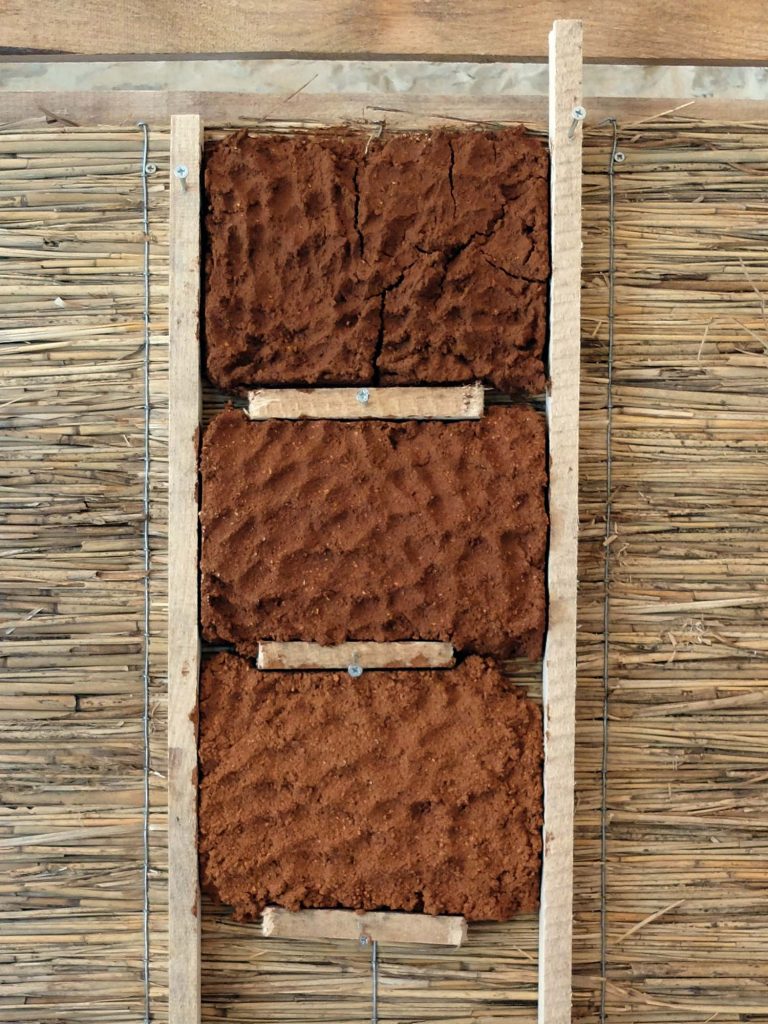
  • 1 volume of earth combined with 1 volume of sand (top frame)
  • 1 volume of earth combined with 2 volumes of sand (middle frame)
  • 1 volume of earth combined with 3 volumes of sand (bottom frame).

The best combination of characteristics were demonstrated in the bottom frame: the material stuck well to the reed (enough clay to bond the aggregate together and stick it to the support construction), almost no cracks (not too much clay), fell apart only when I hit the plaster with a lot of force (not too much sand).

What is the right thickness of a clay plaster? It depends on the sizes of the grains in the mixture. Optimal is 3x size of biggest particle. In my case the biggest sand particles had 4 mm which made the optimal plaster 1.2 cm thick.


I mixed (quite) some buckets of the concoction, got helpers and we started applying the mixture on the wall. Finally!

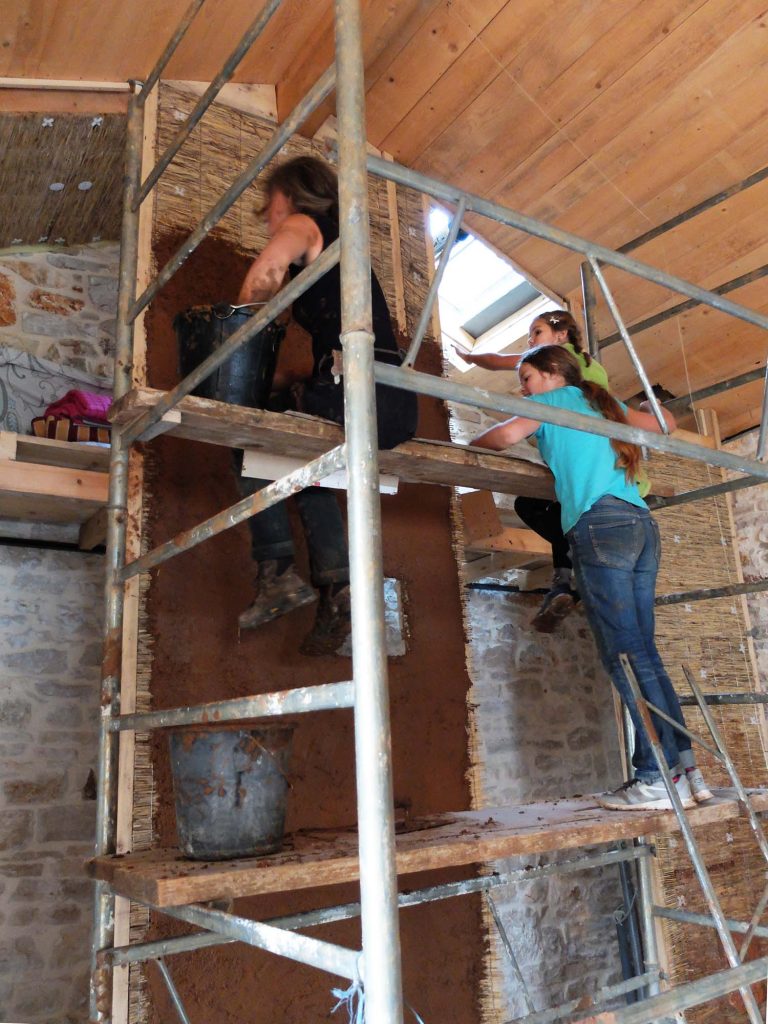
The function of the base coat is to smooth out any irregularities in the wall, in order to obtain an even surface with good binding attributes on which the finish coat can be applied evenly. There were a lot of details that needed to be refined before the finish coat could be applied.

The door frames were installed so I put some flax net around the corners to prevent the cracks from appearing while the material dries.

I put the little windows in place, installed the electrical outlets and filled in all the holes I could find. The base coat was ready.

Because I wanted a smooth finish for the plaster, I sieved both of the materials through a mesh with openings the size of 1 mm.

I did a new set of tests to try out the finishing layer on the dried base coat.


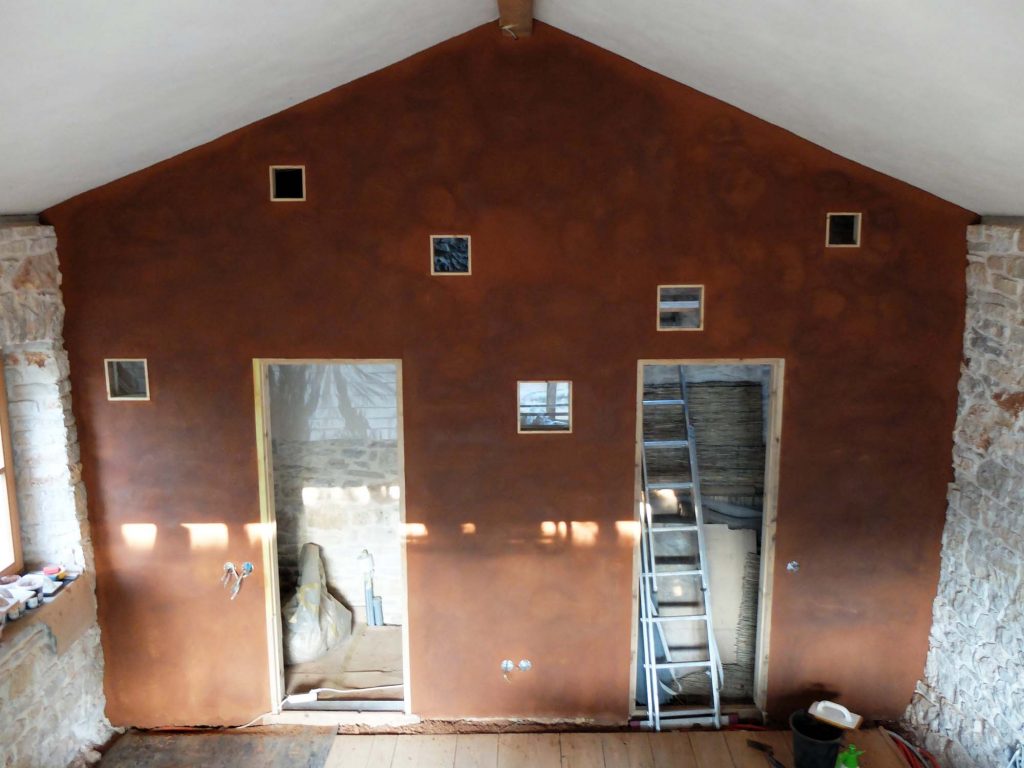
I chose the composition (1 volume of earth mixed with 3.5 volumes of sand grains 0 – 1 mm), made enough mixture to cover the whole wall in one go with 3 mm cover and got to work.

It took me 21 hours and it looked amazing.

Then it all cracked.

*Mistake No.1: no fibers in the base coat (a conscious choice).

So I sanded all of the cracks.

I filled up the cracks with material in order to make the plaster more stable, and had another try with a layer of material between 1 and 2 mm thick. I took me 16 hours this time and again it looked amazing.

And again it all cracked.

*Mistake No.2: if the supporting structure is as unstable as reed panels and you don’t use fibers to stabilize the base coat of the plaster, you can secure the plaster surface with a mesh (jute, flax) spread out across the entire surface of the base coat (again a conscious choice not to do that).

I was getting tired of the game of putting up a new beautiful layer of material and have it crack when it dries. So this time I tried another experiment: I sanded the cracks and filled them up with the material, but instead of putting on another layer of material, I dissolved the clay in water and applied it as paint. 

It took me 4.5 hours and it looked good. And this time it didn’t crack. 🙂

So what were the lessons of my experimental procedure with the use of Istrian earth?

The most important one: yes, you can utilize the soil just as it is and use it in various ways as a building material. But through the different mistakes I made I also realized another important aspect: by using proper additions with the mixture, you can make your life a whole lot easier. 🙂

Doors and windows

Winter is knocking on our doors again. It’s time to put down the trowel, reflect on the year gone by and share all the steps we managed to make on our path of the stone house renovation.

Last year we managed to brush off the marks of time off the stone walls and protect them with a roof. Before the next stages of refurbishment took place and we started with the renovation of the interior, the outer shell needed to be waterproof. We filled up the smaller holes with mortar. What belongs in the bigger remaining openings? Doors and windows 🙂


I do have to confess I still get confused with the Istrian time warp; it takes me by surprise again and again. The perfect example is the story about how the doors and windows came into existence.

The first time I met (the third) carpenter on site was on 16th February. We went through all the plans, looked at every technicality, measured every possible dimension and agreed on every detail. 1 big door, 2 smaller windows and a big glass wall were to be made and installed in 3 months. Far from cheap but the quality would be worth it. It sounded fabulous and we shook hands on it.

The first complication was the steel frame on the east wall. It needed to be installed before the final measurements for the glass wall could be completed. After a year of searching for anyone that would be willing to make a non-corroding steel frame and talking to all the uninterested companies in the vicinity I gave up the search for local production and ordered it in Ljubljana. After I waited quite some time for the order to be made, it was done exactly as we agreed upon (thank you Klemen!). Then some more waiting for the zinc plant in Austria to accomplish its anti-corroding magic, some more waiting for the painting of the frame to take place and I could finally transport it to the coast. The steel frame was installed on 10th July.


Now everything was ready and since we agreed on the schedule with the carpenter there will be no more waiting for the manufacturing of the doors, right?

As it turned out, the carpenter did not order the wood yet so there was no appropriate material to manufacture the elements yet. So we waited for the ordered wood to make its appearance.

After the wood came there was no suitable steel track for the glass window. Why? The manufacturer stopped delivering the product to Croatia and soon I was looking everywhere, including all the neighbouring countries to import the part myself. Since it was the beginning of August already everyone was off for vacation.

After some remarkable stunts we managed to get the steel track. There were the wood and the track, but there was no suitable varnish. Then the varnish came and the weather was not right for the application. What else could we have possibly still been waiting for? Oh yeah, I forgot the yearly vacation the carpenter’s company takes in August that they forgot to mention to me…


The doors and windows were finally installed on the 31th August. Even though it took almost 4 months longer that agreed upon, I was happy with the accomplishment. They looked beautiful and for the first week I couldn’t stop folding the glass wall…


What were the reflections behind the outer appearance of the house?

It is always hard to find the right balance between preserving the old and implementing the new. How do you specify the parameters that make out the right balance?

Vitruvius put it neatly: firmitas, utilitas, venustas.

Firmitas (strength)

It was highly important that the majority of the old stone volume was preserved, but looking at the house from the structural stability perspective, the strength of the east wall was questionable. The original chimney was too heavy and unstable for the wood structure of the roof. The bulky thing broke the supporting structure and leaned its entire weight on the corner of the east wall making a crack in the wall about 10 cm wide.


Utilitas (functionality)

Times change, people’s lives change and the use of buildings with it. Do we want to smother potential and life with the rigidity of the past? I don’t believe absolute preservation is the right approach. This house has seen many glorious moments when people enjoyed their time with each other on its premises. I find this to be one of the key elements of this renovation: to give the people as many options as we can provide them with so they can enjoy the true beauty of the moment in this magical setting. Some people look for tranquillity, some look for nature, some for companionship. Be what it may, cutting an opening in the only wall where we were allowed to do that – in order to connect the inside of the house with the outside space – seemed like the right choice.

I am aware it is not a traditional feature by any stretch of the imagination. But do I want to relish the outside while cooking under the pergola and at the same time have the option to share my time with someone inside the house? Yes. So that’s why I yielded to making a big opening in the east wall, a folding glass surface 3.7 m wide and 2.3 m high.

For the times they are a changin’ (B.D.1964).


Venustas (beauty)

I’ve come to cherish the simplicity of form, the usage of the materials in the close proximity of the building and the durability of technically well executed details. Beauty? I will let everyone judge that for themselves.

The roof

After putting in all the effort in the last year’s renovation battles, we needed to protect the hard obtained achievements somehow. What sort of a safeguard is the best to protect a house from the weather and other ambience influences? A roof 🙂

We took great care at dismantling the old roof. The goal was to reuse the maximum quantity of the substance used for the original cover. Unfortunately, the whole wooden construction was eaten away by termites.


The only material, that was still usable, was the old roof tiles. Of the 1500 we took down, about 1000 could be reused again. The roof tiles need to be attached to the new construction somehow in order for them not to fall off the pitch of the roof. Nowadays 3 methods are commonly used: they can be glued to the surface with mortar, glued to the surface with polyurethane sealing foam or they can be hammered to the wooden battens.

The mortar was too heavy for the foreseen construction, the polyurethane foam was a no-go for me, so the option we were left with, was putting a nail through each tile to attach it. There weren’t any holes in them yet so Matej took on the arduous task of drilling through a 1000 tiles last summer. My deepest gratitude to yet another astonishing human being for putting in so much time and effort needed to bring my dream a step closer to reality.


The cover made of roof tiles was taken care of, what else is needed for a proper roof? Construction and thermal insulation.

It was always clear the construction was going to be made out of wood. It was an endeavour to find an 8m long beam of the proper height that would serve as a main supporting agent. I was enthusiastic about finding and old oak timber but after a month of fruitless attempts we’ve settled on a company in Bani (a village 80 km away) manufacturing poles out of new spruce wood in appropriate length. We were still left with the issue of the height of the beam though, because the material available did not have the height our construction engineer proposed for it. After some contemplation we have found the solution: we got two beams, stacked them one on top of the other and connected them vertically with wooden pins. It took quite some coordination to get a skilled carpenter that could pull away such a stunt but we found the right person and the ridge beam was built in.

We’ve prepared a dent between the outer layers of stone on the top of the wall for the concrete crown and the mixture was poured onto the steel reinforcement that was laid out inside the dent beforehand.


The wall plates (spruce) were connected to the steel spikes attached to the concrete crown beforehand, consequent parts of the timber construction were the rafters out of larch.


It was quite a struggle to decide on the right materials to use for the complete composition of the roof and the insulation part was proven to be very tricky. Ever since I came in contact with straw as a building material, I thought I was going to use it for the insulation on our roof.

Last year I attended the first Croatian convention on natural building materials and heard that across the country rats have a devastating effect on straw roofs. I wasn’t able to shed second thoughts and started looking for an alternative. Since we are close to Adriatic coast my ideas went as far as seaweed: it has excellent resilience qualities and it has been commonly used for centuries on islands like Læsø in Denmark as cladding and roofing material.


© Holger Leue and realdaniabyogbyg.org

In the end I settled for another idea: wood chips from a local woodworking mixed with lime powder. 

Wood has decent thermal qualities and lime would suppress any desires animals might have to look for a shelter in the roof.


The mixture of the two ingredients was distributed between the boards anchored to the top and bottom side of the rafters. The vapour control layer (paper membrane) was preventing the mixture from falling through the holes between the boards.


I wanted to prevent the summer overheating with insulation instead of cooling the house with air conditioning, so I wanted to make sure the roof is sufficiently protected. Another layer of lining was foreseen on top of the rafters (hemp insulation) and underneath the rafters (wood fibre insulation).

We finally agreed on how to assemble the elements of the gutter detail and the auxiliary wooden construction for the gutter stone was put in place.


The insulation was installed and the roof was covered with impermeable membrane.

The last issue I wanted to address was the rats. We did make sure they would not like the materials used for the renovation of their former residence, but what if they still somehow got inside the roof? The idea was not something I would want to deal with later so we decided to install a steel mesh with apertures smaller than 1 cm (the magnitude through which these wicked animals can squeeze their entire heads and bodies).

We rolled out the net across the entire surface of the roof, over the membrane.


There was one problem though: the overlapping. The mesh came in rolls 1 m wide and as we were spreading them across the surface, they refused to stay flat. The waves of the steel edges were parting for a lot more than 1 cm. My team’s suggestion was to staple the mesh to the wooden construction underneath the membrane but not every joint was on the top of a wooden batten.

I suggested using a thread to unite the 2 separate layers. My construction team was comprised of the most patient workers on the planet Istria and they played along with almost all of my brilliant ideas. But at this very suggestion even Kristijan raised his eyebrows in disbelief. Sewing the roof together?

Thank god I had an ace up my sleeve for this one. I spent that weekend on the roof and my knowledge of sowing was finally used for something other than bag-making 🙂

The last thing regarding the roof we need to decide on: the gutters and the drainage positions.


We’ve managed, somehow, to resolve all the issues we’ve stumbled upon. The time has finally come to nail those tiles down.


It took some more gorgeous sunrises and some more strings but there it is:

the roof 🙂

Foundations

After you clear away everything you need to let go of, where do you start?

With the foundations, of course. This time I’m talking concrete, not the theoretical architectural mumbo jumbo behind it.

How can an 80 year old house stand the very strict structural stability regulations was a debate for quite some time. Ideal situation would be to sustain the structural authenticity and preserve the building material compounds while guaranteeing the construction won’t collapse even in case of an earthquake.

One solution would be to make a solid box connecting everything from foundations to the roof of the house making the whole structure very stable. The extreme interventions in our case would involve concrete foundations underneath the whole perimeter (= digging up segment after segment underneath the stone walls making sure they don’t collapse while we fill the holes with concrete), putting a steel wire on the insides of the walls connecting them with concrete sprayed over the entire surface and a concrete structure for the roof. Besides covering up the beautiful stone walls these interventions would mean turning the whole house into a rugged Faraday cage.

I was trying to go in the direction of using as little cement/concrete as possible, so we tried to go in the other extreme where barely any interventions would be needed. In the end we settled on this version: most of the house sits on solid rock so we’ll just fill in the holes with concrete in the foundations underneath the wall removing the earth where it’s visible. Walls will expose the stone on the inside as well as the outside of the walls while filling entire walls with lime mortar (no cement!) to stabilize them. The concrete crown sitting on top of the wall will support the wood structure for the roof.The structural engineer could justify the interventions for the building permit as reconstruction work and I was happy with the following compromise: we keep the beautiful walls but I comply with the risk that everything goes down with the next earthquake. Beauty always comes with a price 🙂


As it turned out, almost all the walls are sitting on rocks. There were a few patches of earth underneath some parts of the wall so we excavated the earth and filled the holes up with concrete.


The corner on the south east end of the house demanded the most attention. Excavating earth, making the wooden frame and filling it up with concrete should do the trick of stabilizing the walls.


After 2 years of planning and struggling to get the paperwork sorted out, I am still amazed how fast things started happening on the building site. The foundations were ready before we knew it. It’s a good feeling knowing that the house is sitting on something solid.


I did get a comment about the sunny weather lurking from the photos. The pictures were in fact taken a while ago but since I didn’t have the time to write about our progress then, I’m trying to catch up with it now. But getting back to the intensity of the blue on the pictures – you’re right, it cannot be that perfect. It’s all photoshop 😉

Opening the building site

A wise man said to me recently: it’s all just a construct of mind. He was referring to the world as we see it and the actions we take according to those views, but the same goes for the limit we invented separating one year from another for example. It does help to have those kind of reminders built in our culture and society to remind ourselves to pause from time to time, to review where we are and whether or not the direction we’re going to is where we actually want to go.

So where were we with the renovation?

The house was stripped of everything we could bare to miss.


Not many things went in the desired direction on this project but on a good day I still consider myself quite lucky. I was amazed with all the work Marko, our Croatian partner architect did in the struggle to keep the dragons of bureaucracy happy in the quest for a legal renovation.

On top of that we stumbled upon the perfect contractor to renovate the stone walls. A small family business from Sutivanac, a village 30 km away. The dad (Mladen), the son (Kristijan) and their young employee from Slavonija (Domagoj). They have an incredible range of experiences renovating stone buildings in the vicinity for the last 40 years and are one of the rare companies in the surroundings that can validate their knowledge with a conservationist license. They care about quality, strive to make lasting details and there is unpretentious beauty in their technically superb solutions. They are amazing and as fast as greased lightning on top of that.

The moments we shared solving problems over ‘voćkanje’ (a break in the afternoon munching home grown fruit) or talking about daily occurrences while cleaning the joints of the stone walls will go down in my memory as pure jewels of quality cooperation when life and its struggles make sense.

I did realize a while ago it is extremely important who you work with. Because no matter how carefully you plan things, there are always unexpected situations that occur and to be able to rely on people doing their best to solve the issues in those situations is priceless.

So what else have we gotten apart from the perfect contractor?

A crane

skela (=scaffolding)


a fridge


limenka (=a box to keep our belongings safe)


a moving office with the best view ever


and two boards clearly stating we’ve turned into a building site!


Looking over the shoulder I was throwing some last gazes on the year behind us. Doing this type of project was/is really hard from time to time and I am truly happy we made it this far. I have yet to thank everyone involved making my dream come true endowing professional or personal assistance. Many thanks to everyone that expressed an interest for this project in one way or another as well. I wouldn’t get as far as I did without any of you so my deepest appreciation for your support. I’m gathering my spirits to finish the rest of the stone house renovation this year and if you would like to be a part of it in any way, let me know.

Wish you all a colourful year full of hope and magic. It’s nice to get some of both from time to time 🙂